Monday, May 11, 2009

A First Try at Quilting

After making four different baby blankets all the same way... one side a single piece of fabric, the other side a collection of squares sewn together in a way that looks like a quilt, but cannot actually be called a quilt, I decided it was time to experiment with actually quilting a blanket.

I have never taken a class on quilting. I was supposed to do that this summer, actually. With the new baby, that seems unlikely, but I'm sure I'll get around to it eventually. So really, all I know about quilting is this: a blanket becomes a quilt when three pieces of fabric are sewn together with the top stitching. Or something like that. I may be wrong about that definition, actually, but it is with that definition that I proceeded.

I have no idea how real quilters put the middle piece of fabric in their quilts. I wanted to do the whole sew the back and front to each other right sides together and then turn inside out like I did with all of my other blankets ('cause it keeps me from having to figure out how to finish the edges), but I couldn't make a third piece of fabric work with that. So I wound up sewing the middle piece to the top of the quilt, wrong sides together to keep the fabric in place, and then sewing the back on to the double pieced front wrong sides together and then turning the whole thing inside out.

I chose to do the top stitching in concentric squares because someone told me that was pretty easy... you just use the foot to keep the lines the right amount apart.

I'm doing each set of four pieces of fabric with their own squares. The quilt itself is 6x8 little squares, so there will be a total of 3x4, or 12 sets of quilted bigger squares, if that makes sense. I completed the piecing together of the blanket and 2 of the 12 top stitching parts tonight. Hopefully in the next few days, I'll finish the other 10 and then I'll have my finished quilt.

Here's a view from the back, which really just illustrates how much nicer the quilt would look if I would bother to put some sort of binding on the edge, but I think tackling one new technique at a time works best.

Thursday, March 26, 2009

A Blanket for Baby


I just finished my latest project: a blanket for the new baby. Ironically, I actually started another blanket before Christmas and still haven't finished it. I guess as long as it's done by mid May, I'll be fine.

For this blanket, I chose the orange because it's the color that I have come to associate with this baby and I chose the blue because I liked the way it complemented it with the stripes and the jungle animals. I was originally going to put blue bias tape around the edges, but in the end, I liked how it looked as is, so even though the edges don't have a fully finished look, I'm happy with it. The back is a solid piece of the orange fabric.

Saturday, March 7, 2009

New Pillows

I recently redid the pillows in my sunroom. It felt really good to be able to make these... pillows are strangely expensive and can really change the flavor of the room. Previously, I had a set that were more quilt-looking and gave the room a straight-up country feel. My house, with all of the exposed wood, already tends towards that home-grown country style and I really don't like it (I mean, I love my house, I don't like that country style). I do, however, want the decor to go with the house (so no ultra modern black and white, for example), so I aim for more a mission, Frank Llyod Wright style, or a somewhat French country look.

For the fabrics, I had to work with the sage green on the chair in the sunroom and the cream on the walls. I wanted to use toille because I thought it gave that French country look and I just like it. I chose to use a maroonish purple as the accent color.

This is my comfy green chair -- the one that in about three months I will be sitting in a lot, nursing the new baby. The chair is a little too deep, so I have a pillow for added support. I used the cream toille and a solid cream (on the back) to make a pillow case for a standard bed pillow. I chose to make a pillow case that would come off so that any baby spit-up could easily be washed off.

These are the futon pillows. I used a cream toille, a maroon toille, a stripe, a floral and then a solid maroonish purple for each of these. The solid green pillows that you can kind of see behind these are store bought and had previously gone with the quilted country pillows, but were solid and neutral enough to stick around.


This is the futon as a whole. I really like how the new pillows look with the old ones and with the existing futon cover and wall art.

For contrast, you can see the old pillows here.

Sunday, December 28, 2008

An Apron for Suzanne


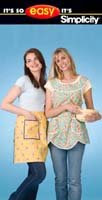
I was really happy with the way this apron came out... in the end. See, it's the one on the right of the pattern book:


Well, on me, those scallops at the bottom look like huge arrows pointing to hips and saying "look at me!!!" On Suzanne's slender frame, though, they just looked like scallops. I also didn't like the top and modified it a bit, to good effect, I think. The apron is fully reversible with each fabric being used in the opposite way on the other side. Overall, a success!

Friday, October 17, 2008

Apron for Natalie


This is my latest sewing project: an apron for a friend's house warming gift. I think the whole thing turned out well and I used the apron as the "wrapping" paper for a cookbook which was the other half of the housewarming gift.

This is actually a napkin I bought at Wal-Mart of all places with some cream fabric as the border. I also did a cream backing which I think gave the apron a nice weight.

And I think it goes especially well with Natalie's kitchen!

Sunday, July 27, 2008

Bias Tape

Turns out that bias tape, in addition to being something you might buy at the store, is something you (meaning me) can make. I followed these super easy instructions:

http://www.savvyseams.com/techniques/biastape.php


I haven't actually gotten to use my new home made bias tape, yet, but it looks like the real deal (only more flowery), so I think it turned out well.

The drawback, of course, is that I just spent two hours figuring out this process, cutting fabric, sewing, ironing, watching Grey's Anatomy, etc. and then measured the bias tape: I made 3 yards. I only need six for the project I'm doing next.... So, not as fulfilling as some other things I've done, but first of all, the next 3 yards will go much, much faster, and secondly, once I finish the entire project, I predict a great sense of pride in making the whole thing myself.

There better be a great sense of pride.

Apron -- Not a Failure : )

This is my latest pattern -- Simplicity 3670. I like the retro look of the apron, and I think it might be more functional than most, since it covers the entire shirt. I think the first try went well. I wish the scalloped bottom looked better, but putting bias tape on a triple curve was a trick, let me tell you. Oh, and the apron wasn't as slimming on me as it seems to be on the 5'11" model on the pattern cover. Bummer.