Monday, June 30, 2008

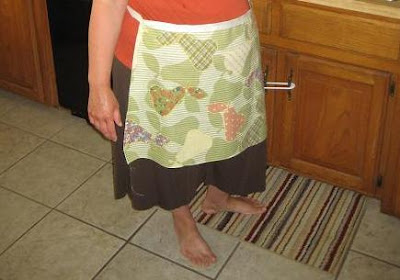
Yucky Apron -- FAILED

This is the apron I made today.

I hate it.

Really hate it.

In fact, it failed. Totally. (More about failed projects at the bottom of the blog.)

But I promised (sort of) in this blog mission statement that I would share successes and failures, so I feel compelled to share pictures of the yucky apron. And the lessons learned from it.

First of all, beginners should stick to using patterns. Period. Do not think to yourself, hey I'm a beginner, but how hard can an apron be?

Secondly, I just hate the fabrics. I mean, I know I picked them out, but I was choosing from the $2 fabrics at WalMart, 'cause let's face it, if you are going to make a colossal mistake with a patternless apron, wouldn't you rather do it for $2 a yard than say $6 or even $8? The flip side is, when you mess it up, it doesn't even have a pretty pattern or nice texture to distract from the awfulness. So even when buying $2 fabrics, hold out for colors that you at least sort of like.

And then, to compound things, I was determined to finish the apron even through I could tell early on that I hated it. So I finished it alright, but with some really terrible stitching. I mean, the waist was too high, so I just kind of gathered up some material from the waist and sewed it back (as opposed to taking out the original stitches, cutting some fabric off the waist, and then sewing it back. And my bias tape on the top looks terrible. Yuck!

Oh, and I think this apron makes me look fat.

Alright, now that I have shared how terrible I think this apron is, let's set some ground rules about failed projects. (Which I was always mark with the word failed at the top, so you don't accidentally consider my masterpiece to be a failure by mistake.)

Rule 1 -- Be honest. Don't send some smaltzy comment about how it's not that bad, yada, yada, yada. This is not a complement fishing expedition.

Rule 2 -- Join the bandwagon. In this case, it's the yucky apron bandwagon. Consider the offending item to be a person we are in a workshop or convention with and we really, really don't like them. Let's talk behind its back. It's the only thing that will make me feel better. Stupid apron. I bet it didn't even go to college.

Rule 3 -- It's going in the trash. Really, stuff that I consider to be total failures are going in the trash. If for any reason, you want this utterly hideous thing, you must first be a person I actually know, and then I'll just give it to you. So you can throw it in the trash. First come, first serve.

So if you are getting ready to deal with fish guts, let's say, and need something with good coverage to protect your nice clothes, and want to throw it away before getting in the car (less fish gut smell that way). Send me an e-mail or comment. The yucky apron can be yours.

Trash day is Thursday.

Sunday, June 29, 2008

My First Commercial Pattern

After all of the pillows, table runners, drawstring bags and aprons, I really wanted to get into making dresses for my daughter. The first pattern I have attempted is New Look 6578.


It was a really great choice for a beginner. Especially if you opt not to do the fancy appliques. Technically my sewing classes will cover "how to follow a commercial pattern" next month, but with just what I had learned about seam allowances and seam finishing in class, plus what I had learned about making button holes from the folks who sold my machine to me, I was able to complete this dress. Actually, I have now made four of these dresses and all of them after the very first one came out this well. But two of them are in the wash, having already been worn, and the latest one is waiting for me to go out in search for coordinating buttons.


I also had to look up an on-line tutorial for using bias tape (which is what gives the dress the nice red hem). I thought that this tutorial was the best:

http://angrychicken.typepad.com/angry_chicken/tutorialsrecipes/index.html

Not only was it helpful, but the lady who does it is so very funny. It's how to use bias tape with no swearing. ('Cause if you are sewing a dress for your toddler, you definitely want to keep from swearing.)

Aprons, Aprons, Aprons

Pretty cool apron, huh? I thought so, too, and when I realized how easy it was, I started going through all of my dish towels turning them into aprons for my daughter and myself. In fact, I got so dish towel apron crazy that when I went to do the dishes later, I found that I was out of towels!

Anyway, the directions on how to make this adorable apron can be found at this site:
http://jas.familyfun.go.com/arts-and-crafts?page=CraftDisplay&craftid=11092

Using their directions, and improvising some on my own, I made these aprons:


Then, for myself, I wanted a "tie at the waist" apron, so I took my prettiest dish towel, sewed the edges to make a trapezoid shape and then sewed some nice ribbon to the top edge. Since it's a dish towel, the bottom edge already has a nice seam to it.

Getting Creative

Having learned the bare basics, I convinced my husband to buy me a sewing machine for my birthday (okay, it was an early birthday present, since my birthday is still a few weeks away).

I chose a Janome. According to the folks I talked to, it was best to buy from a sewing store (as opposed to Target or WalMart), so I went to Austin Sew & Vac. The gentleman there listened to my plans for what I wanted in a machine, and my budget, and recommended this one:


With my very own sewing machine and the barest information about how to make a pillow (remember the pin cushion from the beginning lesson?), I made a few pillows of my own:


Then, having made a drawstring bag which in the middle step looked like a table runner to me, I made my own table runner:


The table runner was pretty simple. I took two complementary fabrics, folded them in half. On the fold, I cut a house shape (square with triangular roof). I then sewed the two fabrics wrong sides together, leaving about four inches unsewn and then turned the whole thing right side out. For the part that was left unsewn, honestly, I didn't do anything. Once I ironed the whole thing, I couldn't see the gap and I thought with my current level of sewing, doing a whipstitch on the edge would be more noticeable than leaving it as is. And this way, I can finish the edge later once I've learned more.

How It All Began

In early June, I started sewing classes. Looking on-line, I found The Stitching Studio. Here's the link, by the way:

http://www.austinstitchingstudio.com/

In the first two classes, we learned how to operate the machine and some basics. (I think that the part that really helped me in getting started was the "things will go wrong, needles will break, it will be okay" lesson.) I also learned to make a small pillow/pin cushion and a drawstring bag.


Overall, learning to sew has been everything I hoped it would be: a fun, creative outlet that keeps my hands and mind busy.