Sunday, December 28, 2008

An Apron for Suzanne


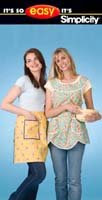
I was really happy with the way this apron came out... in the end. See, it's the one on the right of the pattern book:


Well, on me, those scallops at the bottom look like huge arrows pointing to hips and saying "look at me!!!" On Suzanne's slender frame, though, they just looked like scallops. I also didn't like the top and modified it a bit, to good effect, I think. The apron is fully reversible with each fabric being used in the opposite way on the other side. Overall, a success!

Friday, October 17, 2008

Apron for Natalie


This is my latest sewing project: an apron for a friend's house warming gift. I think the whole thing turned out well and I used the apron as the "wrapping" paper for a cookbook which was the other half of the housewarming gift.

This is actually a napkin I bought at Wal-Mart of all places with some cream fabric as the border. I also did a cream backing which I think gave the apron a nice weight.

And I think it goes especially well with Natalie's kitchen!

Sunday, July 27, 2008

Bias Tape

Turns out that bias tape, in addition to being something you might buy at the store, is something you (meaning me) can make. I followed these super easy instructions:

http://www.savvyseams.com/techniques/biastape.php


I haven't actually gotten to use my new home made bias tape, yet, but it looks like the real deal (only more flowery), so I think it turned out well.

The drawback, of course, is that I just spent two hours figuring out this process, cutting fabric, sewing, ironing, watching Grey's Anatomy, etc. and then measured the bias tape: I made 3 yards. I only need six for the project I'm doing next.... So, not as fulfilling as some other things I've done, but first of all, the next 3 yards will go much, much faster, and secondly, once I finish the entire project, I predict a great sense of pride in making the whole thing myself.

There better be a great sense of pride.

Apron -- Not a Failure : )

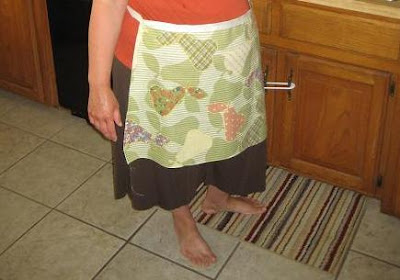
This is my latest pattern -- Simplicity 3670. I like the retro look of the apron, and I think it might be more functional than most, since it covers the entire shirt. I think the first try went well. I wish the scalloped bottom looked better, but putting bias tape on a triple curve was a trick, let me tell you. Oh, and the apron wasn't as slimming on me as it seems to be on the 5'11" model on the pattern cover. Bummer.

Saturday, July 26, 2008

Pants


I just made my first pair of pants. These green ones were made in class, using McCall's M4497. I was hesitant on the ruffled bottoms, but the instructor convinced me that learning the technique would be a good idea. She was right.

And the ruffle isn't too bad:


But when it came time to try out the technique again at home, I opted for the plainer cuff:


Mostly, I was too chicken to try the ruffle technique without a cording foot to hold the cording in place to gather the fabric, and I haven't made it to the store to get the new foot, yet. But overall, I'll call the first two pairs of pants a success.

Photography

I have always enjoyed the idea of taking pictures -- not just the kind that go on a blog or in a photo album, but the kind that looks like it might be art. So yesterday, when Jeremy surprised me by taking the day off work AND he took the little bear to the sitters so that we had the entire day to ourselves, I told him I wanted to go around town and take pictures. We focused on downtown and the university. This is what we came up with. (The first and last ones are Jeremy's, the others are mine.)


Tuesday, July 22, 2008

Baby Blankets

I recently made two baby blankets, but had to wait until the respective mothers (and fathers) received the blankets before I could put them on the blog:


This one is for my old college friends who did their nursery in these great bold red and blue. They are also very active in their church, so I thought the Icthus and Cross fabric suited them well. I made the top with a simple patchwork pattern of alternating colors and the back is a solid piece of the Icthus and Cross print. I put an additional piece of the cream fabric in the middle to give the blanket more weight and to make the red and blue show through to the back less.


This one is for a couple I know in Houston -- the mother is a pediatrician and the father works for NASA. Guess who picked the nursery theme? I was excited to make the space themed blanket since stores don't really carry much of that, but I was worried that the father would take exception to the planets not being in appropriate scale to each other.... I chose the black and dark blue to go with the space backgrounds and then used the the light blue and grey to look like the sky. The back, which I didn't get a picture of, is a solid piece of starry fabric.

Tuesday, July 15, 2008

Broken Machine?

Last week, my machine jammed up. I finally got it to the shop today. The place I take it is owned and operated by an older gentleman I'll call "Mr. C." Mr. C is amazing. He's old enough to be my grandpa, and he totes sewing machines around like nobody's business and can sew even more impressively. This is my conversation with Mr. C:

Me: I think I broke my machine, or slightly less likely (gesturing to my toddler), she broke it while I wasn't looking.

Mr. C: Well, let's take a look.

(Mr. C sets up my machine, threads it, and sews a perfect stitch.)

Me: I guess it's like going to the mechanic for your car. It's going to work just fine for you, isn't it.

Mr. C: Well, I don't see anything wrong with it. Maybe you were threading it wrong.

Me: Let me try while I'm here.

(I sit down, thread the machine and then it jams up again.)

Mr. C: Hmmm. I'll look at it again.

(Another perfect round of stitching.)

Mr. C: Yep, you must be threading it wrong, but I can't say I see what you did wrong.

Me: Let me do again.

(I start threading the machine, slowly this time.)

Mr. C: Now, did you hook the thread here? (Gesturing at a never before seen hook by the needle.)

Me: No, should I?

Mr. C: Well, it won't work if you don't.

Me: I guess that was the problem, then.

Mr. C: It sure looks that way. Can I help you carry the machine back out to the car?


Problem solved. The new mystery is how I got it to work for three weeks without ever noticing that hook.

Wednesday, July 9, 2008

A Shirt for Me


This is my first attempt at making a shirt for myself. It was too tight at the hips and the material didn't gather the way I wanted, but overall, I consider the first attempt a success in that:

a) I did learn how to gather the material, even though I wasn't very successful with the first try.
b) I learned that when the pattern says "use a stretchy fabric" it means it.

So, for my next attempt, I will use a stretchy fabric and see if that doesn't work better, as advertised.

Wednesday, July 2, 2008

Bookmarks

For the Fourth of July, I decided to help my daughter make some bookmarks to take to our friends at a local nursing home.
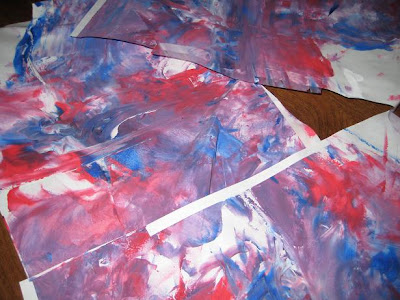
To start, I let my daughter finger paint on plain white paper. A little warning here: red, white, and blue really do make lavender when mixed together by a toddler. I figured folks at a nursing home wouldn't care so much, but if I were making them myself, I would have preferred a little less color mixing.
Then I cut the paper into strips. I didn't worry too much about making them all the same size so long as they were all bookmark sized.
Then I used clear contact paper to make them a little sturdier and a little more finished-looking without the trouble and cost of having them laminated.

Finally, I used a h
ole punch to put a hole in the top and added some red, white, and blue ribbon through the hole.

All in all, I was very happy with the results. They look child-made while still looking good and being very functional.

Monday, June 30, 2008

Yucky Apron -- FAILED

This is the apron I made today.

I hate it.

Really hate it.

In fact, it failed. Totally. (More about failed projects at the bottom of the blog.)

But I promised (sort of) in this blog mission statement that I would share successes and failures, so I feel compelled to share pictures of the yucky apron. And the lessons learned from it.

First of all, beginners should stick to using patterns. Period. Do not think to yourself, hey I'm a beginner, but how hard can an apron be?

Secondly, I just hate the fabrics. I mean, I know I picked them out, but I was choosing from the $2 fabrics at WalMart, 'cause let's face it, if you are going to make a colossal mistake with a patternless apron, wouldn't you rather do it for $2 a yard than say $6 or even $8? The flip side is, when you mess it up, it doesn't even have a pretty pattern or nice texture to distract from the awfulness. So even when buying $2 fabrics, hold out for colors that you at least sort of like.

And then, to compound things, I was determined to finish the apron even through I could tell early on that I hated it. So I finished it alright, but with some really terrible stitching. I mean, the waist was too high, so I just kind of gathered up some material from the waist and sewed it back (as opposed to taking out the original stitches, cutting some fabric off the waist, and then sewing it back. And my bias tape on the top looks terrible. Yuck!

Oh, and I think this apron makes me look fat.

Alright, now that I have shared how terrible I think this apron is, let's set some ground rules about failed projects. (Which I was always mark with the word failed at the top, so you don't accidentally consider my masterpiece to be a failure by mistake.)

Rule 1 -- Be honest. Don't send some smaltzy comment about how it's not that bad, yada, yada, yada. This is not a complement fishing expedition.

Rule 2 -- Join the bandwagon. In this case, it's the yucky apron bandwagon. Consider the offending item to be a person we are in a workshop or convention with and we really, really don't like them. Let's talk behind its back. It's the only thing that will make me feel better. Stupid apron. I bet it didn't even go to college.

Rule 3 -- It's going in the trash. Really, stuff that I consider to be total failures are going in the trash. If for any reason, you want this utterly hideous thing, you must first be a person I actually know, and then I'll just give it to you. So you can throw it in the trash. First come, first serve.

So if you are getting ready to deal with fish guts, let's say, and need something with good coverage to protect your nice clothes, and want to throw it away before getting in the car (less fish gut smell that way). Send me an e-mail or comment. The yucky apron can be yours.

Trash day is Thursday.

Sunday, June 29, 2008

My First Commercial Pattern

After all of the pillows, table runners, drawstring bags and aprons, I really wanted to get into making dresses for my daughter. The first pattern I have attempted is New Look 6578.


It was a really great choice for a beginner. Especially if you opt not to do the fancy appliques. Technically my sewing classes will cover "how to follow a commercial pattern" next month, but with just what I had learned about seam allowances and seam finishing in class, plus what I had learned about making button holes from the folks who sold my machine to me, I was able to complete this dress. Actually, I have now made four of these dresses and all of them after the very first one came out this well. But two of them are in the wash, having already been worn, and the latest one is waiting for me to go out in search for coordinating buttons.


I also had to look up an on-line tutorial for using bias tape (which is what gives the dress the nice red hem). I thought that this tutorial was the best:

http://angrychicken.typepad.com/angry_chicken/tutorialsrecipes/index.html

Not only was it helpful, but the lady who does it is so very funny. It's how to use bias tape with no swearing. ('Cause if you are sewing a dress for your toddler, you definitely want to keep from swearing.)

Aprons, Aprons, Aprons

Pretty cool apron, huh? I thought so, too, and when I realized how easy it was, I started going through all of my dish towels turning them into aprons for my daughter and myself. In fact, I got so dish towel apron crazy that when I went to do the dishes later, I found that I was out of towels!

Anyway, the directions on how to make this adorable apron can be found at this site:
http://jas.familyfun.go.com/arts-and-crafts?page=CraftDisplay&craftid=11092

Using their directions, and improvising some on my own, I made these aprons:


Then, for myself, I wanted a "tie at the waist" apron, so I took my prettiest dish towel, sewed the edges to make a trapezoid shape and then sewed some nice ribbon to the top edge. Since it's a dish towel, the bottom edge already has a nice seam to it.

Getting Creative

Having learned the bare basics, I convinced my husband to buy me a sewing machine for my birthday (okay, it was an early birthday present, since my birthday is still a few weeks away).

I chose a Janome. According to the folks I talked to, it was best to buy from a sewing store (as opposed to Target or WalMart), so I went to Austin Sew & Vac. The gentleman there listened to my plans for what I wanted in a machine, and my budget, and recommended this one:


With my very own sewing machine and the barest information about how to make a pillow (remember the pin cushion from the beginning lesson?), I made a few pillows of my own:


Then, having made a drawstring bag which in the middle step looked like a table runner to me, I made my own table runner:


The table runner was pretty simple. I took two complementary fabrics, folded them in half. On the fold, I cut a house shape (square with triangular roof). I then sewed the two fabrics wrong sides together, leaving about four inches unsewn and then turned the whole thing right side out. For the part that was left unsewn, honestly, I didn't do anything. Once I ironed the whole thing, I couldn't see the gap and I thought with my current level of sewing, doing a whipstitch on the edge would be more noticeable than leaving it as is. And this way, I can finish the edge later once I've learned more.

How It All Began

In early June, I started sewing classes. Looking on-line, I found The Stitching Studio. Here's the link, by the way:

http://www.austinstitchingstudio.com/

In the first two classes, we learned how to operate the machine and some basics. (I think that the part that really helped me in getting started was the "things will go wrong, needles will break, it will be okay" lesson.) I also learned to make a small pillow/pin cushion and a drawstring bag.


Overall, learning to sew has been everything I hoped it would be: a fun, creative outlet that keeps my hands and mind busy.